The First Steps Are Hold, Carry And Release
By Bob West
We've talked about training to retrieve in the past, but it's been a good while and it does make for a great winter or early season project, so I thought we might give it a go once again. Our objective is a dependable retrieve, delivered properly to hand, but I'm sure once you've completed the process you'll find results benefiting all aspects of your training. So I encourage you to take these steps with your dog€¦young or old.
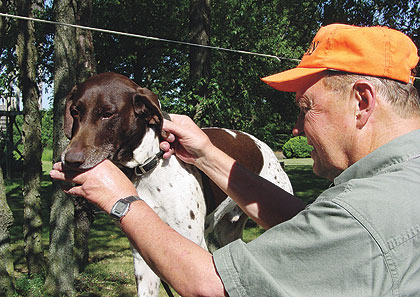 In the first step, Jim Applegate puts the index and second fingers of his left hand into Pongo's mouth, just behind the canine teeth, with his ring finger just in front of the canines and his thumb under the jaw. At the same time he holds the collar with his right hand so he is able to apply pressure to the dog's ear with his thumb against the collar. By keeping your fingers close to the canines and controlling your dog with both hands, even an ornery dog can't bite down. |
Before beginning any aspect of training, it's best to lay out a plan. Think through the steps you feel should be taken for best results. Dogs learn best through "incremental" progress; easily attained steps help build confidence and reinforce an upbeat learning attitude. If you can keep them interested and their mind in the game, you're on the right track.
So what is our plan for teaching the retrieve? We have three primary objectives. First is teaching the dog to hold correctly, next is to carry an object or bird until commanded to release, and third is teaching the dog to pick something up and eventually run out to the object, pick it up and deliver to hand€¦again, all on command.
Throughout these sessions we'll primarily use an avoidance technique--light pressure in the beginning until the dog holds correctly, pressure when he fights, holds loosely or clamps down too much, and release only when he holds correctly. Later we'll overlay and associate a command word sound with that correct response, and within the same timeframe we'll begin to use a release command "cue" as well.
By using pressure on the dog's ear, he will soon understand a correct response turns the pressure off and a quick response totally avoids the pressure.


To view "The Trained Retrieve, Part 2", please click here.
|
|
Equipment Needed
We'll use a short lead, long lead, glove, wood dowel, training dummy, and a "training table" of some sort.
My suggestion for the table comes from NAVHDA. Rip a 4 x 8 sheet of 5/8-inch plywood in half lengthways, then cut one of the resulting 2 x 8 pieces in half crossways. You should now have a 2 x 8 for the tabletop and two 2 x 4 pieces we can use for ramps at either end.
Next, build or buy legs for the main table and set it up so the top comes just above your knees. Once you have the top set, attach one of the 2 x 4 ramps to each end with small hinges so they can be folded up when not in use. (For specific training table plans go to the North American Versatile Hunting Dog Association's website: http://navhda.org.)
The table ends up being a multi-purpose kennel tool but its primary benefit comes during early teaching of command meanings. When a young dog is on the table he's a little insecure and far more attentive to his handler, thus providing a great opportunity to hold his attention for learning.
Again, holding correctly is our first objective. This is where we build in an assurance of proper handling of game. Memories of an exciting slam dunk point and well executed shot can go down the tube if your dog mishandles the bird and leaves it unfit for the table, so our objective early on is teaching the dog to hold correctly.
Choose your command and release words. Many use FETCH to hold or go get an object or bird and LEAVE IT for the release, and we'll use those here too. But it is your choice; all that is important is being consistent once you have settled on which words to use.
Run your dog up onto and off the table enough so he has a feel for it and understands what's going on. Then bring him up facing left or right, your preference. I work with the dog facing left and my right hand through the collar to steady him; this way I can also hold the ear between my right thumb and forefinger to pinch when needed. This set-up keeps my left hand free to work with the dog's mouth.
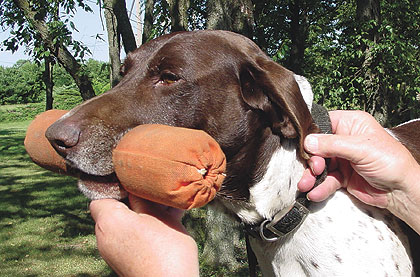 After a time when you feel your dog understands holding correctly, switch to a dowel or small training dummy, like the one shown here, designed for training the retrieve. |
With the dog in this position, force his mouth open and slide your left hand in (actually, two fingers are enough), being very careful to stay near the front of the dog's mouth. I usually 'hook' the canines between my ring finger with my index and middle finger resting inside on the first couple premolars, leaving my thumb to clamp from below if needed.
When you put your fingers in the dog's mouth there might be a battle, but stay with it; he'll soon calm down or at least stop fighting, and when you feel any relaxation, reward the dog with calm, reinforcing praise. This may sound silly, using your hand rather than a dowel, but your hand allows for better sensitivity and a faster response on your part.
Start using ear pressure when the dog resists holding your fingers correctly, but be quick to let up when he does. Be patient, as it may take several five- to 10-minute sessions for your dog to begin to conform and consciously focus on a correct hold. Do not shortcut this session, or any others, for that matter.
Only after you're sure the dog understands, and purpose
ly holds correctly, should you begin overlaying the command cue FETCH in a calm, soothing tone, along with a "good dog" or two€¦whatever you say to reinforce a good job.
Go easy on the praise, however, as too much praise tends to "wash out" what was learned. Like too much pressure, too much praise or excitement tends to take the dog's mind away from focusing on the task and any correct response "absorbing" gains.
At some point soon you'll be able to add a release command. Many trainers use LEAVE IT. Push your left hand toward the back of your dog's mouth rather than pulling your hand out. This causes a gagging reaction and a quicker release. Reward correct behavior.
As you progress have the dog hold for longer periods, making sure the grip is correct and the release is prompt.
Your goal is a conscious, firm but gentle grip on your hand until commanded to release, and in turn an understanding or tool to make sure your dog handles game correctly in advanced training and hunting situations.
How long do you work on this? Each dog is different, but I do feel short sessions are better, as it's easier to hold the dog's attention and that in turn speeds progress. This does not mean you should quit when they balk, however; just back up a little and work through any problems, and only quit on a good note with you're in the driver's seat and your dog has responded correctly.
This part of the process may only take a few days or it may take two weeks, but continue until your dog responds well to FETCH and understands it means to hold correctly; and LEAVE IT means to promptly release.
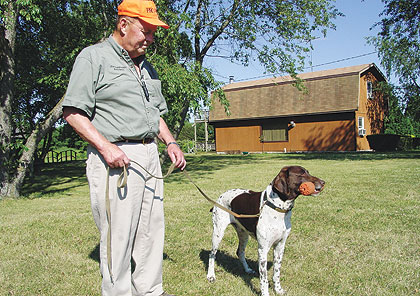 Once your dog understands holding correctly and carries the dummy reliably on the table, move to the ground and continue reinforcing the hold and carry. Do not allow him to drop the dummy until commanded to release. |
Remember, this is our base for proper handling of game and advanced obedience work, so don't fall short here.
Next we'll introduce a dowel or small training dummy€¦small because we want the dog to be successful. With a smaller object the dog's jaw is more comfortable and it's easier for him to breathe, so he's less "panicky" and more attentive to lessons. Big dummies and birds will come later.
We use the same set-up as before, with your dog facing left and your right hand in his collar. At this point you can use FETCH while you force the dog's mouth open, put the dowel in and make him hold.
Start ear pressure when you give the command to FETCH and maintain pressure until the dog has accepted the dowel and holds it correctly.
If your dog spits the dowel out, pinch and maintain the ear pressure until you've picked up the dowel, put it back in his mouth and a conscious firm grip is re-established. You are not making progress if the dog stands with the dowel hanging from his mouth; there has to be a conscious asserted effort to hold the dowel. If there isn't, go back to the hand in the mouth and ear pressure until it works, then come back to this level and repeat the same.
Sometimes a shake by the back of the neck will wake up your dog and let him know, in the same way mom did, that you're not putting up with his behavior. After this, you should choose a good spot to end the session on a positive note, but do it soon and put him up and allow some time for this to "soak in" for a while.
By maintaining pressure until the dowel is back in place and held correctly you're reinforcing what's already learned and letting your dog know there are no options. At the same time you're preparing him for future steps; you should notice the dog begin to reach for the dummy as you return it, hoping to turn off the ear pressure. Reaching for the dummy is part of later sessions.
Your goal is a conscious, firm but gentle grip on your hand until commanded to release, and in turn an understanding or tool to make sure your dog handles game correctly in advanced training and hunting situations. | |
From here, work on getting your dog to hold the dowel as he takes a few steps on the table. If he drops it, another thing you might try along with ear pressure is popping him lightly under the chin with your free hand while repeating FETCH.
Once your dog walks on the table while carrying the dowel, heel him down the ramp and around the yard. Use your imagination to put him through the paces to further reinforce his understanding that FETCH means hold correctly and carry, through thick and thin, no matter what. Never allow him to drop the dummy, but only release on command.
On some natural retrieving gun dogs, this much training will get you by€¦at least you have a means for enforcing delivery to hand once the bird is picked up.
Next issue we'll follow up with the additional steps for training to retrieve. I'm sure you'll find that once the process is completed, you have not only a dependable retriever but you have enhanced your dog's overall obedience, as well.
At the same time, remember not to make it all work. Let your dog relax and have some fun, and you do the same.