Here's how to ensure you'll have a plentiful supply of birds for training.
By Bob West
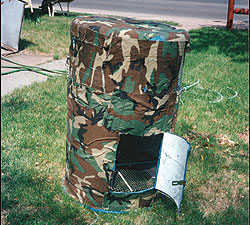
 This view shows the front openings and recall funnel. |
With hunting season over and the weather still on the iffy side, now is a great time to check over your training equipment and make ready for spring. We have to account for missing or loaned out stuff, clean up, repair or replace what's missing… and maybe build something new.
If you're so inclined, here is a great idea for a bird release system.
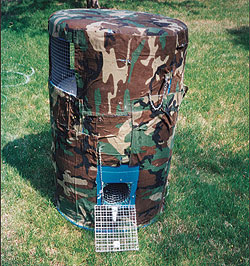
Called the "mini-house," it's a great way of assuring yourself of workable birds in your training areas. It's nothing more than a scaled down version of the larger, more elaborate "Johnny house" used by trainers for years and I feel it is a wonderful idea and a great project for folks with a limited training area or only a few dogs to work.
For that matter, if you have a large private area or club grounds, you can build several and space them out. Being smaller and less conspicuous than the "Johnny House" is an advantage, and the "mini" is durable, cheap to build, easy to clean, handle, and move around.
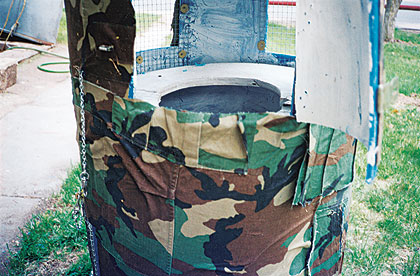 Top door assembly, showing resting platform. This is the door used to release birds once they are conditioned to the Mini-House. |
I credit the mini-house to Max Kammerlocher. Along with his wife Pat, Max owned and operated Arrowridge Kennels in Norman, Oklahoma until his death. The first mini-house I remember seeing was one that Max carried with him as he traveled so he was able set up and work dogs while he was on the field trial circuit.
With its variety of applications, the mini-house is a great idea for trainers. I've outlined its construction here so you can build one for your own use.
DIRECTIONS FOR ASSEMBLY
In the finished product our barrel is actually upside down, so the smooth bottom surface with no openings to leak rain or snow becomes our top or roof.
1. Cut the top or bung end out of the barrel, leaving about a 2 inch lip all the way around to support our hardware cloth floor.
2. Measure and mark all openings with marking pen.
a. Release door, 7' X 10". Stay down 2 1/2" from thetop. Location, top front center.
b. Two windows 7" X 10", one on each side and in line with the release door. Leave 3" of material between door edge and window opening so you have room to mount door hinge and hasp assemblies.
| MATERIALS LIST | 

• One clean 55 gallon plastic drum.
• Three small hasp and staple sets.
• Four 2" hinges.
• Four square feet of 1/2" mesh screen (hardware cloth).
• One piece of 5/8"" plywood, 24' X 10".
• Roll of wire for lacing.
• Machine screws, nuts and washers or pop rivets for mounting hasp and hinge assemblies.
TOOLS
• Electric drill
• Heavy duty marking pen
• Square
• Measuring tape
• Saber saw or keyhole saw
• Pliers
• Tin snips
|
|
c. Bottom access door, 10" X 12" opening. Be certain to stay up 1" from the bottom. This opening is cut at the rear of the mini-house.
d. Recall funnel door, a 5" X 5" opening. Again, leave a 1" lip up from the bottom. This door goes on the front, bottom side of the Mini-House.
3. Drill starter holes then saw the openings, starting with the top windows. Suggestion when cutting the doors: If you make the vertical cuts and attach the door hinges and hasps before cutting the door free across top and bottom, you'll find it easier. Top release door and recall door only have one hinge centered on the left side while the large rear access door gets two equally spaced.
4. Cut the plywood resting platform. Use the outside radius of the barrel to mark the first cut, then swing another radius resulting in a 6" wide shelf for the birds to set on, around the front inside half of the mini-house just below the front window and release door area. Next secure the resting shelf to the barrel with wood screws through the wall from the outside.
5. Cut and shape the call-back funnel from 1/2" hardware cloth, leaving a half inch flange to lace through on the 5" X 5" open end. The funnel should slope in and upward tapering from the 5 X 5 inch square opening to a 3" or less round hole at the top, just big enough for the returning quail to slip through.
6. Cut the two window covers from the 1/2" hardware cloth, making them 1/2" larger than the window openings.
7. Drill 1/8" holes around the window and call-back funnel openings and lace the hardware cloth firmly to the barrel. Recall door should be in place before funnel is laced in.
8. Using the barrel's inside diameter as a guide, cut the hardware cloth in a circle to form the bottom floor, then drill 1/8" holes around the 2" bottom lip. Put the hardware cloth inside on top of the lip and lace it down tight to the barrel.
9. If you wish, camo the barrel with decoy paint, netting, or material to match the cover in your training area.
10. Feeders and waterers can be as simple or elaborate as you wish, but they must be provided in some way.
 Bottom rear door provides access t o feed and water. |
Using the Mini-House Call-Back System
The Mini-House will handle a dozen to 15 birds well.
For the first day or two, don't release the birds; just let them get used to the barrel. Keep all doors shut and allow the birds time to sun themselves on the resting shelf and look the area over.
Always place the mini-house with the closed backside toward prevailing weather, which is northwest throughout most of the country.
On days 3, 4, and 5, open the top door and fly four or five birds, leaving the rest inside to sun and call the fliers back. Remember to close the call-back funnel door each night even if all the birds haven't recalled so predators can't get into the mini-house.
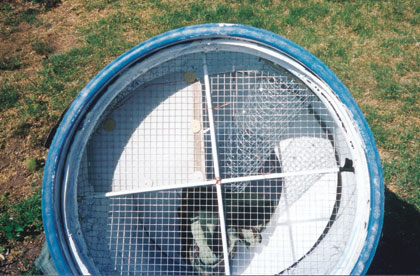 The mesh bottom allows droppings and spilled water to fall through, along with providing some ventillation. |
From then on you can fly most or all the birds and they should recall if not overworked or chased from the area. Now you have another tool for your training program…good luck!